
這是歷史版本頁面 — 看 Adobe DNG Converter 最新版本
RAW格式太多怕以後打不開,Adobe DNG Converter在做什麼
 Adobe DNG Converter 9.2.1
資料更新 2020-04-14
閱讀約 6 分鐘
你翻出幾年前拍的RAW檔,想重新整理一下,卻發現當初那台相機早就停產,原廠軟體也停止維護,新裝的看圖軟體根本打不開這些檔案。更麻煩的是,你手上有兩三台不同品牌的相機,每台都有自己的RAW格式,每次要處理照片就得在不同軟體之間切換,光是想把檔案統一歸檔就卡關。
一般人遇到這種狀況,最直接的想法是轉成TIFF或JPEG,但TIFF檔案巨大、JPEG又會壓縮掉原始資料,兩種都不是理想的保存格式。這類工具的切入點,是提供一個中立的、公開規格的RAW格式,讓你把各家相機的專屬RAW檔轉成同一種格式,既保留原始感光資料,又不用擔心未來某家廠商不玩了、格式失傳的問題。
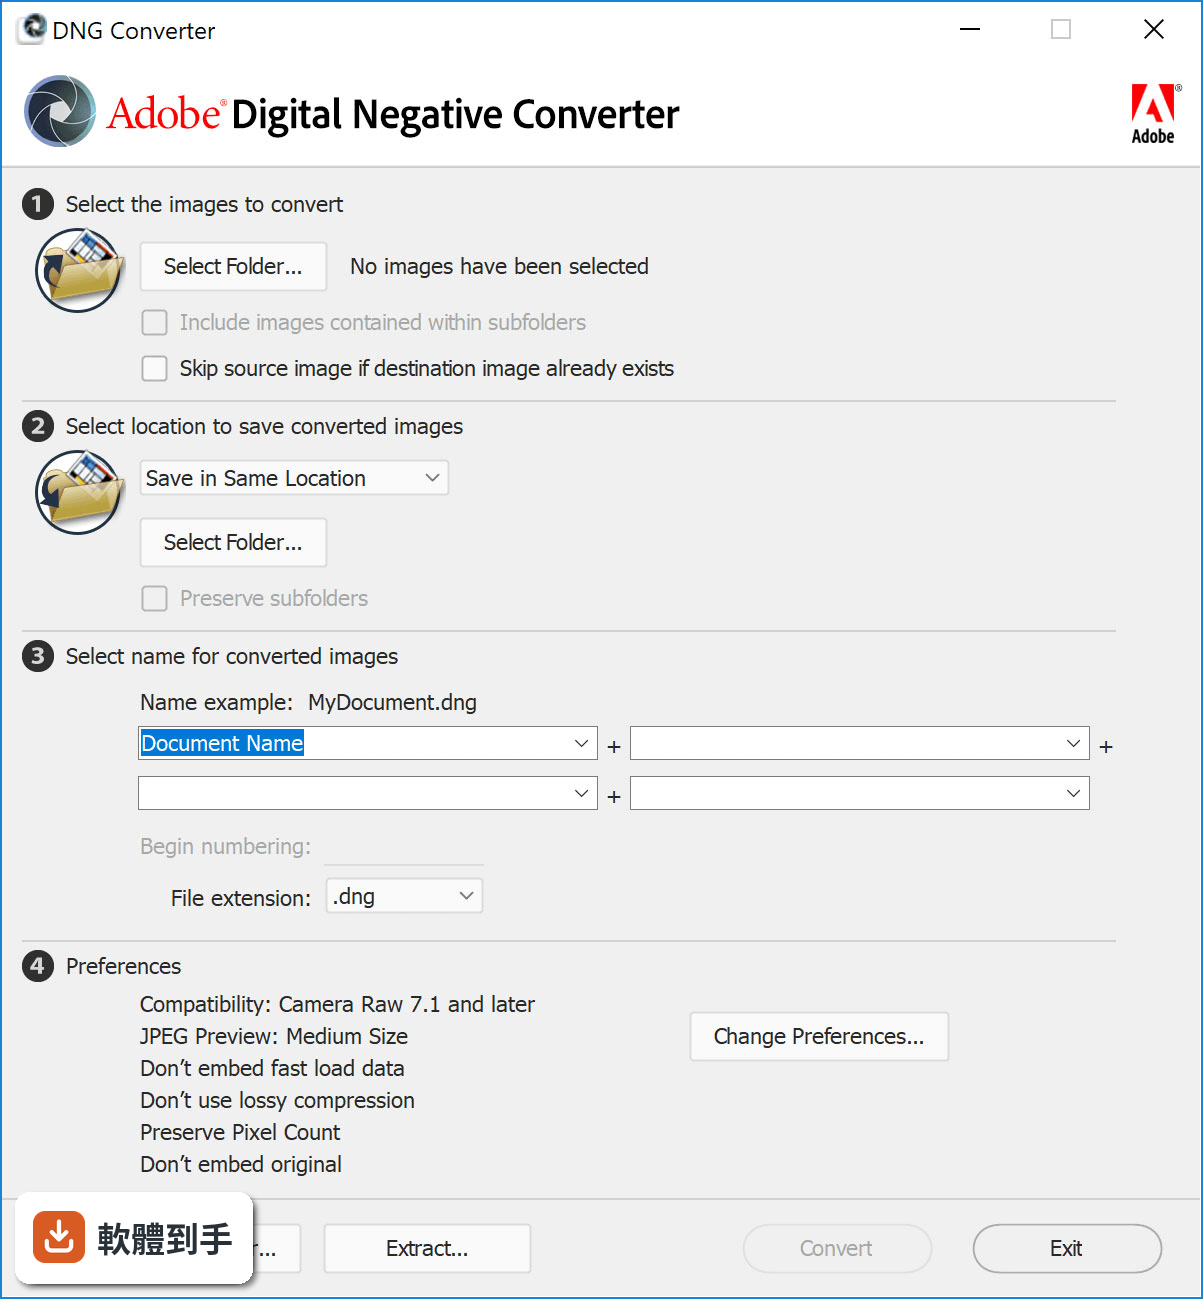
01Adobe DNG Converter到底是做什麼用的,我原本的RAW檔直接丟進Photoshop不行嗎?
它專門把各家相機的RAW檔轉成DNG格式。你原本的RAW檔如果Photoshop或Lightroom認得,確實可以直接開,但問題在於RAW格式是各廠商自家的規格,未來支援可能中斷。轉成DNG之後,檔案變成公開的開放標準,任何支援DNG的軟體都能開啟,不用擔心原廠哪天停止支援你的相機型號。
02轉檔之後畫質會不會變差,我辛辛苦苦拍的原始資料會不會不見?
轉換過程保留原始感光元件資料,包含中繼資料和色彩描述檔,不會重新壓縮或破壞畫質。DNG本身是未壓縮或無損壓縮的格式,轉檔後你還是可以像原本的RAW檔一樣調整白平衡、曝光、雜訊抑制,編輯彈性不會打折。
03我一次要轉好幾百張照片,它能不能一次處理完?
可以,它支援批次處理。你只要指定來源資料夾和目的地資料夾,它就會把整個資料夾裡的RAW檔全部轉成DNG,不用一張一張手動轉。轉檔期間你可以去做別的事,跑完再回來檢查結果。
04我的相機是比較舊的型號,它還認得嗎?
官方說明指出它支援超過600款相機,涵蓋Canon、Nikon、Sony、Fujifilm等主要品牌,而且持續更新以加入新相機的支援。你的舊型號如果不在支援清單裡,可以到Adobe官方網站的Camera Raw頁面查詢完整清單,確認你的相機型號有沒有列在上面。
05轉成DNG之後,對後續編輯有什麼好處?
DNG格式在Adobe軟體裡有更好的編輯彈性,例如雜訊抑制、亮部還原、白平衡調整的效果都比原本的專屬RAW格式來得好。另外,因為DNG是開放標準,不只Adobe的軟體,其他支援DNG的第三方軟體也能開啟,你未來要換編輯軟體也不會被綁住。
06我只是一般拍照的人,不是專業攝影師,用得到這套軟體嗎?
如果你手上有不同品牌的相機,或者你習慣把照片長期保存、幾年後還會回頭整理,那統一格式對你就有實際幫助。如果你只有一台相機、拍完馬上修圖、不會留著RAW檔好幾年,那轉檔對你來說就比較無感,可以不用多這道手續。
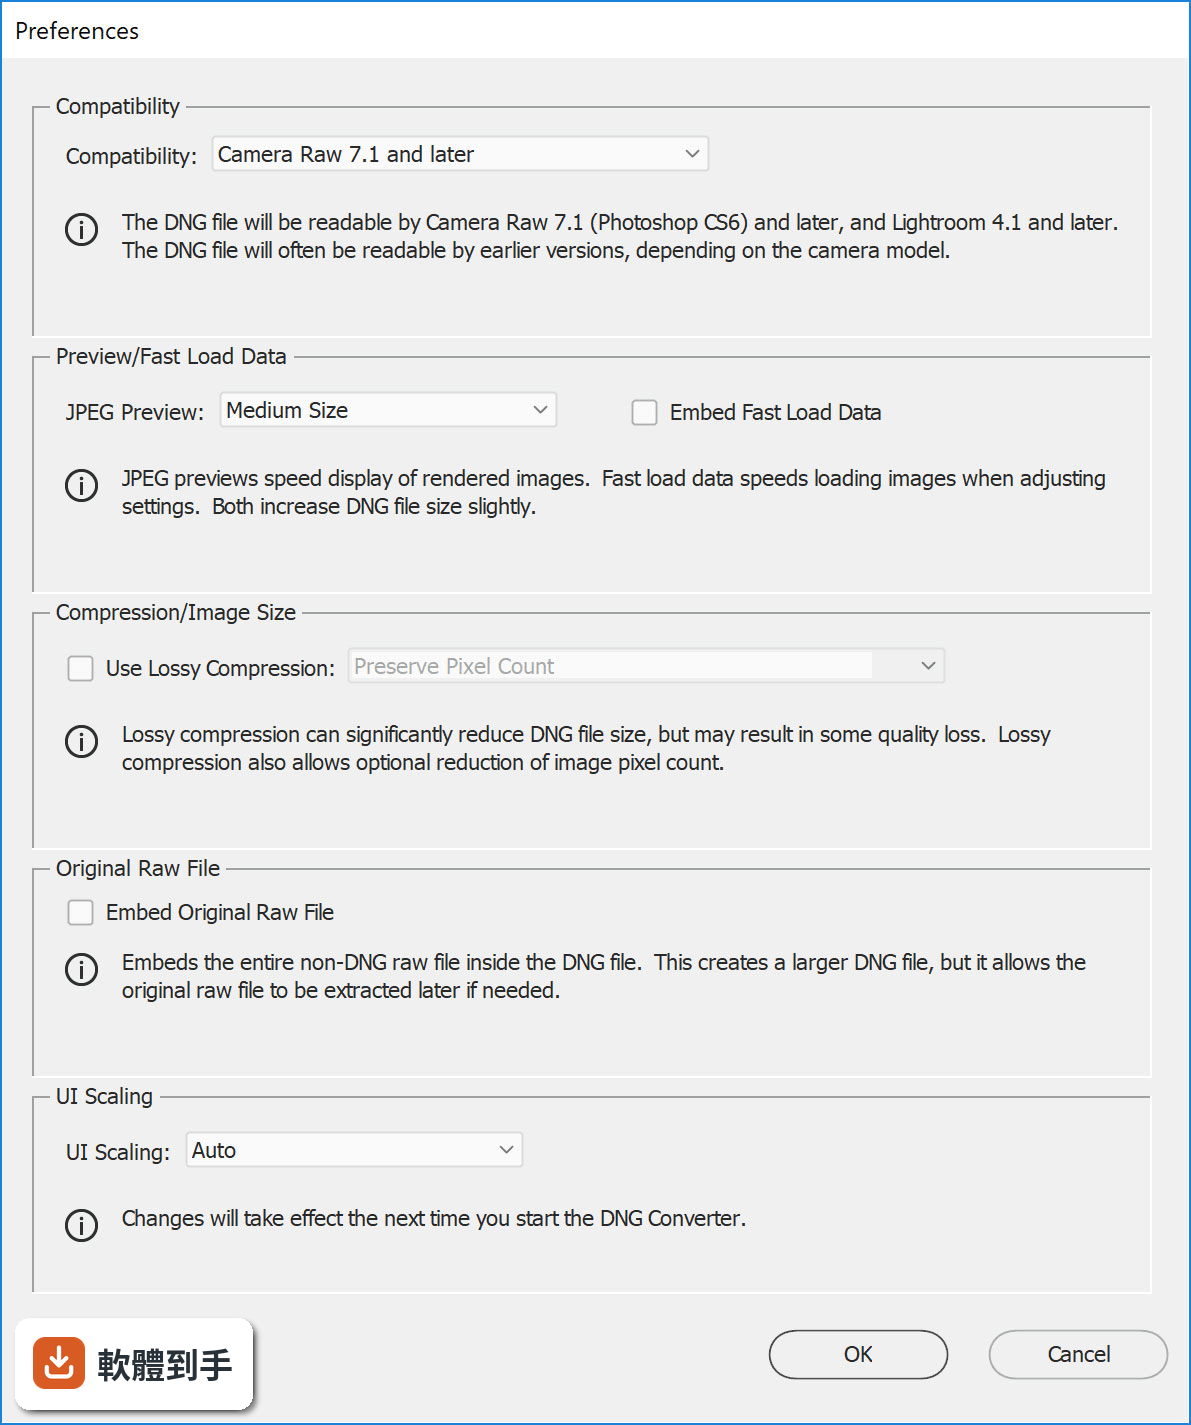
07我已經在用Lightroom管理照片了,還需要另外轉檔嗎?
Lightroom本身就有匯入時轉DNG的功能,如果你已經用Lightroom管理全部照片,其實不太需要另外開DNG Converter。這套軟體比較適合的場景是:你有一批舊RAW檔想一次轉完、或者你不想開Lightroom只想單純轉檔、又或者你根本不用Adobe的編輯軟體。
08這套軟體只有英文介面,我看不懂英文會不會很難操作?
介面確實只有英文,但操作流程很單純:選來源資料夾、選目的地資料夾、按Convert按鈕,就這幾個步驟。如果你只是要轉檔,不太會遇到看不懂的選項。但如果你需要調整進階設定,例如重新命名規則或相容性選項,那就需要基本的英文閱讀能力。
09我主要是用Mac電腦,這套軟體有Mac版嗎?
官方說明提到它支援Windows和macOS兩種系統,你提供的資料只列出了Windows 10和Windows 11的支援,macOS版本需要到Adobe官方網站確認目前支援的系統版本。建議直接上官網看下載頁面,上面會列出完整的系統需求。
10這套軟體跟Adobe Camera Raw有什麼不同,我該用哪一個?
Camera Raw是Photoshop和Lightroom裡面的RAW處理引擎,負責解讀和編輯RAW檔,它不是獨立轉檔工具。DNG Converter是獨立的免費工具,專門把RAW轉成DNG,不做編輯。如果你只是要轉檔,用DNG Converter;如果你要編輯RAW檔,用Camera Raw。兩者可以搭配使用,先轉DNG再進Camera Raw編輯。
11我聽說RawTherapee也是免費的RAW處理軟體,跟這套比起來如何?
RawTherapee是完整的RAW編輯軟體,包含轉檔、調整、輸出等功能,而DNG Converter只做單一事情:把RAW轉成DNG。如果你需要的是編輯功能,RawTherapee能做的事情多很多;如果你只是想把RAW統一成DNG格式,DNG Converter更輕量、操作更單純。兩者定位不同,看你需要的是什麼。
12這套軟體一直有在更新嗎?會不會用一用就沒人維護了?
從版本紀錄來看,它更新頻率相當高,近一年內有多次更新,而且持續加入新相機的支援。Adobe有持續維護這套免費工具,因為DNG格式是Adobe推廣的開放標準,他們有動機維持這套轉檔工具的可用性。不過軟體維護狀況隨時可能改變,建議使用前到官方網站確認最新狀態。
下載與官方連結
Lightroom_Classic_Set-Up.exe · 2 MB · 連結指向軟體原廠
版本紀錄
- 2026-10-16 Adobe DNG Converter 18.7 1.7 GB
- 2026-08-26 Adobe DNG Converter 18.6 1.7 GB
- 2026-08-05 Adobe DNG Converter 18.5 1.7 GB
再看 5 筆
- 2026-07-10 Adobe DNG Converter 18.4.1 1.7 GB
- 2026-06-22 Adobe DNG Converter 18.4 1.7 GB
- 2026-06-04 Adobe DNG Converter 18.3.2 1.7 GB
- 2026-05-20 Adobe DNG Converter 18.3.1 1.7 GB
- 2026-04-24 Adobe DNG Converter 18.3 1.7 GB
這一版改了什麼
What's new in this version:
Adobe Photoshop Lightroom Classic CC 2020 9.2.1
- Change log not available for this version
Adobe Photoshop Lightroom Classic CC 2020 9.2.0
Improved Raw Default Settings:
With this release, we have added the ability to easily configure default settings for raw images in Lightroom Classic. The default settings will affect how images are processed during import and can be observed when you click the Reset button in the Develop module. You can set the defaults to the following:
- Adobe Default - Uses Adobe default settings
- Camera Settings - Uses the in-camera settings or profiles as-shot
- Presets - Uses an Adobe or custom preset of your choice
You can apply the settings via:
- Master - Applies the selected default for all raw images
- Camera - Applies default based on specific camera models
- Selecting Show serial number will allow you to specify different settings for multiple cameras of the same camera model based on the serial number.
PSB file support:
- You can now import, catalog, and edit Large Document format (PSB) file in Lightroom Classic. PSB file in Lightroom Classic supports documents up to 65,000 pixels in long edge and a maximum dimension of 512 megapixels. Camera Raw 12.2 is required to use Lightroom Classic's Edit in Photoshop feature with PSB images.
Other enhancements:
- Choose monitor for secondary window
Auto Sync improvements:
- Now, while making changes to the Develop settings with Auto Sync turned on, the Auto Sync button will be prominently visible. This is to easily and quickly check when Auto Sync is enabled and avoid syncing of Develop settings on all the selected images by mistake. Also, when you hover over the Auto Sync button, a tooltip displays the number of images on which the develop settings will be applied.
Photoshop Elements 2020 support:
- With this release, you can now import Photoshop Elements 2020 catalog into Lightroom Classic
GPU Accelerated Editing for Lens Correction and Transform:
- Expanding on our GPU support, we have added full GPU acceleration for Lens Correction and Transform adjustments
Adobe Photoshop Lightroom Classic CC 2019 8.4.1
- Change log not available for this version
Adobe Photoshop Lightroom Classic CC 2019 8.4
Accelerate image-editing with GPU support:
- Use the GPU of your system to enhance image-editing experience
Organize your collections with color labels:
- Color labels can be added for collections, collections sets, and smart collections
Support for new cameras and lenses:
- Find the full list of supported cameras and lens profiles
Other enhancements:
- Find information about PNG export, batch merge for HDR and panoramas, and other new enhancements in this release
Adobe Photoshop Lightroom Classic CC 2019 8.3.1
- Change log not available for this version
Adobe Photoshop Lightroom Classic CC 2019 8.3.0
Remove shading using Flat-Field Correction:
- Remove shading or lens cast, a typical optical artifact, from your photos
Smoothen or enhance details with Texture slider:
- Accentuate or smoothen details such as skin, bark, and hair with the new Texture slider
Support for new cameras and lenses:
- Find the full list of supported cameras and lens profiles
Other enhancements:
- Find information about other enhancements in this release
Adobe Photoshop Lightroom Classic CC 2019 8.2.1
- provides support for new cameras
Adobe Photoshop Lightroom Classic CC 2018 8.2
- Change log not available for this version
Adobe Photoshop Lightroom Classic CC 2018 8.1
- This release of Lightroom Classic CC rolls out new features and enhancements such as customization of Develop Panel, Add to Collection option in auto-import settings, Grid Snap option in book module, other enhancements, support for new cameras and lenses, and bug fixes.
- Customize the order of Develop panels
- With this release, you can now drag the Develop module panels in the order you would like to see them in.
To customize the Develop panel menu, do the following:
- Right-click (Win) / Control-click (Mac) on the header of any panel.
- Select Customize Develop Panel from the context menu that opens.
- In the Customize Develop Panel dialog box that opens, drag the panel names in the desired order.
- Click Save. To restore the default order, click Default Order before Save.
- Relaunch Lightroom Classic to see the Develop panels in the new order in the Confirm dialog that opens.
Add photos from a watched folder to a Collection with Auto Import:
- In the Auto Import settings, you can now use the Add To Collection option to directly pull photos from a watched folder into a specified Collection.
- The Auto Import feature monitors a watched folder for photos and automatically imports them into the Collection you've set as the destination. After you set up a watched folder and specify a destination Collection in the auto-import settings, you can simply drag photos into the watched folder. Lightroom Classic CC automatically imports those photos in the specified Collection, allowing you to bypass the import window.
To add photos from a watched folder to a Collection, do the following:
- Go to File > Auto Import > Auto Import Settings.
- In the Auto Import Settings dialog box, set up a watched folder and select the Enable Auto Import option.
- In the Destination area of the dialog box, select the Add to Collection check box. Lightroom Classic now displays a list of all your Collections.
- Select any Collection as your destination for auto-import.
- Optionally, you can also click Create Collection to create a new collection and select it as the destination for import.
- Click OK.
- Align photos in a Book layout with the Grid Snap guides:
- You can now easily align photos in a Book layout using the Grid Snap option in the Guides section. In Grid Snap, choose either Cells to align the cells of two photos with respect to each other, or Grid to align photos with the grid guide lines.
- On moving the photo, it would snap into place based on the selected setting. By default, the Grid Snap option is set to Cells.
Duplicate preset handling:
- With this release of Lightroom Classic CC, if you attempt to create a duplicate preset with the same name under the same group, a Duplicate Preset Name dialog box opens with options to:
- Replace - Select this option to keep only the latest preset with the same name in the group
- Duplicate - Select this option to keep two presets with the same name listed in the same group
- Rename - Select this option to append a numeric extension to the name by default or rename it yourself
Show partially compatible presets:
- On opening a photo in the Loupe view in the Develop module, some presets may not appear in the Presets panel due to incompatibility with the selected photo, such as camera profiles that are not applicable to the current photo or presets that only apply to raw files. The non-compatible presets are shown as faded and in Italics style in the Presets panel in Develop.
To see all presets even if they are not compatible with the current photo, do the following:
- Open a photo in Loupe view and click Edit.
- Select Preferences from the drop-down menu.
- Select Presets under the Preferences panel.
- In the Visibility section, select/deselect Show Partially Compatible Develop Presets to show/hide partially compatible develop presets.
- Show partially compatible presets in Lightroom Classic
- Check 'Show Partially Compatible Develop Presets' checkbox to see all presets
- For detailed information about working with Develop presets, see Work with Develop presets.
Photo merge enhancements:
- Photo merge: Requirements for merge operations that could have led to merging failures in earlier versions have now been relaxed. Now you can merge images with differing dimensions, focal lengths, and orientation.
- Photo merge preview caching: Lightroom Classic now caches the previews generated for Photo Merge operations. This improves performance and provides a better user experience.
- Single-step HDR-Pano merge: Now you can perform single-step panorama HDR merge using smart previews.
- For more helpful information on merge operations, see Create Panoramas and HDR Panoramas.
Performance enhancements:
- Improved sync reliability and stability.
- Improved performance while doing batch operations such as import, preview generation, DNG conversion, and export.
- Improved grid scrolling performance on Hi-DPI displays.
- Improved performance when switching between Develop and Library Loupe.
Other enhancements:
- Cancel on exit: With this release, you would see a confirmation dialog on exit so that you can choose to cancel exiting from Lightroom Classic CC. If you select Don’t show again checkbox from the confirmation dialog, you need to reset warning dialogs (Preferences > General > Reset All Warning dialogs) to see the confirmation dialog on exit again.
- Color Labels for folders: Support has been added for color labels for offline folders. For more helpful information, see Create and manage folders.
- Support for Photoshop Elements 2019 catalogs: Support has been added for importing Photoshop Elements 2019 catalogs in Lightroom Classic CC. For more helpful information, see Import photos from Photoshop Elements.